Feeds:
Posts
Comments

Sweet Potato Pecan Pancake with Maple Yogurt Goat Cheese SauceMy Aunt Jean used to tell me, while feeding me split pea soup for lunch as a child, “It will put hair on your chest”, a metaphor for making me grow up big, strong and healthy. Only now do I realize what ancient wisdom she was imparting to me at my young age. Pea flour has been manufactured and sold through a few small producers for some years, albeit somewhat unsuccessfully. Lack of consumer education and insufficient known ways to use the product made for limited sales. When I heard about what Churchill Global International is doing with pea flour, I was compelled to research the current availability, usage and health value of any pea flour thoroughly, for myself.

I first started expanding my notions of the health value of peas in general. Through my research I found the main advantages of peas:

*Lower cholesterol levels significantly with their soluble and insoluble fiber
*Regulate blood sugar stability through their low glycemic index
*Reduce cancer risk through their richness of isoflavones and other
phytonutrients
*Isoflavones, a plant estrogen, helps reduce hot flashes in menopausal women

Here is an excerpt from the American Cancer Society:
“Phytonutrients or phytochemicals are plant compounds like carotenoids, lycopene, resveratrol, and phytosterols that are thought to have health-protecting qualities. They’re found in plants such as fruits and vegetables, or things made from plants, like tofu or tea. Phytochemicals are best taken in by eating the foods that contain them rather than taking supplements or pills.”

In my search to find pea flour for my recipes I found brands of green pea flour online, though not a single yellow pea flour. I could not find any pea flour sold in any store in New York City, a city where you can find practically every food item or ingredient from anywhere in the world. Even online, Bob’s Red Mill website was out of stock. Further online searches revealed that Barry Farm offered green pea flour for $7.25 a pound with a shipping fee of $10.75. As a chef and food stylist, my biggest obstacle for using their expensive pea flour for my recipes is that green pea flour would make an unsightly and unappetizing looking meal. Churchill Global’s yellow pea flour is made from non-GMO organically and sustainably grown peas from their veganic farm. Then sprouted and dried, the split yellow peas are milled into pea flour and pea protein powder.

What is a veganic farm and why sprout the peas before milling?

A veganic farm uses no chemicals, and houses no livestock. If peas touch the soil where animal manure is present, they are susceptible to contamination from Hemorrhagic Escherichia Coli, Salmonella and Listeria. Cleator Farms is listed as a veganic farm by One Degree Organics. There are always some chemicals almost anywhere you farm, due to rainfall, spray drift from outside sources, and birds flying overhead. The use of shelter-belts (wind breaks such as trees) and rotation management minimizes the contamination. One principle cause of contaminates on most other farms in North America is glyphosate (Round-up from Monsanto is one example). Cleator Farms boast an extremely low level of chemicals, especially glyphosate, on their land. Their levels of glyphosate are consistently measured to be 5 parts per billion. The permitted level in Canada is 5 parts per million. The US tolerance is 30 parts per million.

Why is the use of sprouted peas and grains important to health and nutrition?

You may have seen a variety of sprouted grain breads and baked products in the market over the last two decades. It has long been known that sprouting legumes, grains, nuts and seeds increases their digestibility in the human body. Sprouting is described as a pre-digestive step.

The benefits of using sprouted peas before drying and milling are many fold.

• Increases nutrient absorption of vitamin B12, calcium, iron, and zinc
• Makes wheat easier to digest by breaking down gluten
• Decreases phytic acid, an antinutrient which inhibits digestive enzymes
• Decreases lectins and saponins which can cause leaky gut syndrome, auto
immune disorders, gastro-intestinal upset, joint pain and rashes
• Increases folate levels in grains up to 3.8 fold
• Increases protein digestion
• Increases fiber content
• Helps reduce allergens found in grains

Churchill Global International eliminates any danger of post sprouting bacterial contamination, which can be responsible for food poisoning. One method by which this is achieved is using US manufactured equipment to sprout and dry the pea flour, all in one machine. This is an important safety step in processing any sprouted product.

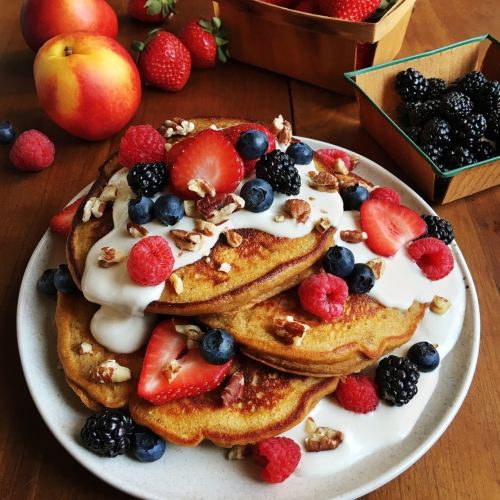
In searching for a superior choice of super food infused goodness for my exquisite Sweet Potato Pecan Pancake recipe, I found much more than I had bargained for. I found a pea flour education. I also found that Churchill Global’s yellow pea flour is not yet on the market for retail sale, but they hope to have it available in the future. I wrote to Mr. Winston and asked him if I could get samples in order to test my pancake recipe. I am happy to present to you a photo of the fruits of my quest.

My recipe for Sweet Potato Pecan Pea Flour Pancakes with a Maple Yogurt Goat Cheese Sauce is graced with just the right amount of sweetness to tickle your fancy. It has lots of fiber and nutrients from the delicious wholesome ingredients and makes an impressive presentation when topped with your favorite fruits.

Sweet Potato Pecan Pea Flour Pancakes with Maple Yogurt Goat Cheese Sauce
Ingredients:
• 3/4 cup baked sweet potato, mashed without skin, about an 8 oz. potato
• 3/4 cup plain Greek style full fat yogurt
• 1 cup cashew, almond or coconut milk
• 2 large or 3 medium eggs
• 3 tablespoons coconut sugar
• 1 tablespoon coconut oil
• 1 teaspoon cinnamon
• ½ teaspoon freshly grated nutmeg
• ½ teaspoon pure vanilla extract
• 1¼ cups yellow pea or chick pea flour
• ¼ cup white rice flour
• 2 teaspoons baking powder
• 1 cup toasted chopped pecans or walnuts, reserve half for garnishing
• Coconut, peanut or grape seed oil for pancake griddle

Maple Yogurt Goat Cheese Sauce
• ¼ cup soft young goat cheese, room temperature
• ¼ cup plain Greek style whole milk yogurt
• 2 tablespoons pure maple syrup
• 2 tablespoons dark rum or cognac
• Warm water or nut milk to thin the sauce to your desired consistency if
necessary.

Instructions

For the Pancakes

  1. In a large bowl whisk together all the wet ingredients until well combined.
  2. In a second bowl, sift together the dry ingredients except the nuts.
  3. Stir the nuts into the sifted dry ingredients.
  4. Heat the pan or griddle on medium heat, lightly brushing with oil between pancakes.
  5. Cook for 3-4 minutes until the bottom of the batter seems browned and firm.
  6. Flip the pancakes and cook for them for another 3-4 minutes.
  7. Repeat with the rest of batter.

For the Sauce

  1. Whisk all the ingredients together until smooth and satiny.
  2. Serve the pancakes topped with the sauce.
  3. Top each dish with fruit and sprinkle with the reserved nuts.

Recipe Notes
1. Keep the finished pancakes in a 200 degree F oven while finishing the rest.
2. Thin the sauce with warm water or nut milk if desired.
3. Use fresh mixed berries in season or sliced stone fruits such as nectarines
and plums for topping the pancakes.

If you cannot get pea flour you can substitute 1 1/2 cups red fife wheat flour or all-purpose flour for the pea flour and rice flour combination.


Photo by David Bishop

dbishop.net

Pesto Rosso is traditionally a Sicilian dish. I changed it up a bit for simplicity and my own personal taste . It is usually made with ground almonds. I love the rich, savory, buttery flavor and texture of pine nuts, which balance the bright sweet sun dried tomatoes and the fragrant fresh basil. I like leaving them whole for the tooth feel and the extra pop of flavor released by chewing whole pine nuts. Toasting the pine nuts in olive oil brings out their nuttiness and is augmented by the Pecorino Romano. The spicy crushed red pepper adds just enough piquancy to balance the dish perfectly. I tried this dish on a friend of mine who usually doesn’t like sun dried tomatoes. He loved it, saying it is one of the best things I have ever made.


Ingredients: Serves 4

  • 2 cups Sun Dried Tomatoes
  • 1 cup Pine Nuts
  • ½ cup shredded Pecorino Romano cheese plus extra for garnish
  • ¼ cup Olive Oil
  • 2 Shallots, coarsely diced
  • 20 or so Basil Leaves, torn by hand
  • Tiny basil leaves for garnish
  • ½ teaspoon Crushed Red Pepper Flakes
  • Freshly ground Black Pepper to taste
  • ½ LB. Semolina Penne Pasta, Dried
  • 1 gallon Water, boiling
  • ½ cup Sea Salt

Directions:

  1. Saute the shallots in 2 TBS. of olive oil until they are soft but not browned
  2. Place the shallots in a food processor with the sun dried tomatoes, another 1 TBS. of olive oil (more if needed) and black and red pepper
  3. Run the processor until the mixture is homogenous but still has some texture
  4. Empty the mixture into a large mixing bowl
  5. Toast the pine nuts in the same pan used for the shallots in 1TBS. of olive oil
  6. Mix the basil in with the Pesto Rosso , ½ cup of the cheese and the toasted pine nuts
  7. Cook the pasta in salted boiling water according to package directions, ~ 8 minutes
  8. Mix the pasta into the bowl of pesto, tossing well
  9. Garnish with more cheese and the tiny basil leaves as desired
  10. Serve with your favorite white or red wine

Also visit my Food News Column on the Huffington Post and my professional site marilinda.com

Photo by David Bishop

http://dbishop.net/

Avocados and oranges make a great pairing in a salad. The avocado is rich and creamy, while the juicy, sweet and tart orange tantalizes the taste buds. Lay them on a bed of the slightly bitter, yet velvety textured, tender magenta colored radicchio lettuce and the wild peppery baby arugula greens, add a squeeze of fresh zesty lime, and a drizzle of fruity olive oil for a melodious experience of sight & savoring. Complete the ensemble with sprigs of aromatic cilantro, freshly ground floral scented pink peppercorns and crunchy flake sea salt crystals and voila…a dreamy luncheon or dinner time side meal.

In this recipe I used Cara Cara Oranges (http://www.sunkist.com/products/cara-cara-oranges.aspx ), because of their uniquely fragrant sweet exotic flavor with undertones of cranberry and a pink orange hue. They augment the avocado in color, flavor and texture. The fruit blend coordinates perfectly with the multicolored and textured mix of lettuces.

Ingredients: Makes 4-6 individual salads

  • 1 head of radicchio
  • 2 cups of baby arugula
  • 1 avocado, sliced and peeled and dipped into lime juice to prevent browning
  • 1 Cara Cara Orange, or any orange you choose, peeled with a knife, sliced into rounds then halved
  • 1 lime, half of it juiced, the other half sectioned into wedges.
  • ½ cup of freshly washed and dried cilantro leaves
  • ¼ cup of high quality fruity olive oil
  • Freshly ground pink peppercorns
  • Liberal sprinklings of flaked sea salt

Directions:

  1. Wash and dry the lettuces
  2. Portion the lettuces into 4 to 6 parts
  3. Slice and peel the avocado, dipping them into the lime juice to prevent browning
  4. With a knife, peel and slice the oranges into cross sections than cut them into half moons
  5. Arrange the lettuces onto each individual plate
  6. Artfully arrange the avocado and orange slices onto the lettuces
  7. Liberally add the cilantro leaves as garnish to the salads
  8. Grind pink peppercorns onto each salad
  9. Generously sprinkle each with flake sea salt, or other salt of your choice
  10. Add a slice of lime to each plate

Enjoy your amazingly beautiful and delicious salad by yourself or with your friends and loved ones.

Also visit my professional web site at marilinda.com and my Food News column at the Huffington Post

Paella Pizzazz

Photo by David Bishop

http://dbishop.net/

The first time I had a really great paella was in Majorca Spain, where every kind of seafood available could be obtained freshly caught, having never been frozen. The flavor and texture is incomparable to our once frozen varieties. The shrimp and baby squid quite literally melted in my mouth. My Uncle Nick had an apartment there in town over looking the marina. Two friends of mine and I were visiting with him for the Christmas and New Year’s holidays. He prepared for us an incredible paella, taking no short cuts, making his stock from scratch.

In my version, seen above, I did my best to recreate the flavors and textures I remembered from Spain. I did take a tiny short cut in buying organic free range chicken stock and clam juice, which I enhanced by boiling it down with chicken wings, a lobster head, shrimp shells, a whole carrot, onion and celery stalk, a couple of bay leaves, a few sprigs of thyme, and a pinch of saffron.

Photo by David Bishop

My photographer friend, David, and I went to a Spanish Restaurant in NYC, El Charro Español, which specializes in paella while we were researching to write and shoot this post, and help me come up with my recipe. I ordered the seafood paella and he ordered the Paella Valenciana, which also included seafood and featured chicken and chorizo, a smoky, spicy sausage. I usually don’t eat pork products due to the high Triglyceride levels, but when I tasted what a difference it made in the flavor of David’s rice compared to mine, I was sold on chorizo in paella as a must. We borrowed a paella pan with the generosity of Luis, the owner of the restaurant. I am told that the pan can make all the difference, but that the most important thing is the proportion of the broth to the rice, and of course the flavor of the broth.

Pre-heat the oven to 450’F and place a shelf close to the bottom of the oven

Meat and Seafood Ingredients:

  • 1 small live lobster-remove the head and small legs for the stock. Cut the tail into 1 inch pieces, leaving the shell on.
  • 4 chicken wings, browned on both sides in plenty of canola oil in a skillet-use 2 for the stock.
  • 12 tiny clams, scrubbed and sorted to ensure that they are alive (I prefer Cockles. They are ridged and have a green tint).
  • 1/2 lb. medium shrimp- use the shells for the stock (and heads if you can get them that way).
  • 1/4 lb. small mussels, scrubbed and sorted.
  • 1/4 lb. sea scallops-cut into quarters
  • 1 eight inch chorizo sausage-sauteed in the same pan with the chicken, then cut into 3/4″ inch thick rounds.

Prepare the seafood and refrigerate until you are ready to put them into the paella pan. Set aside the cooked chicken and chorizo.

Broth:

  • 1 quart of organic free range chicken stock
  • 1 pint of clam juice
  • 1 cup of dry white wine
  • 1   8 oz. can of crushed San Marzano tomatoes
  • 2  chicken wings, browned on both sides as said above
  • 1 lobster head
  • shrimp shells
  • 1 large onion, washed and quartered
  • 1 whole carrot, scrubbed
  • 1 celery stalk, scrubbed
  • 3 bay leaves
  • 3 sprigs of thyme
  • 1 teaspoon crushed saffron fibers

Boil the broth ingredients until it reduces to about half of the volume, or until you need to use it. Strain out the bits and discard them.

Vegetable & Rice ingredients:

  • 1/2 cup chopped onion
  • 1/2 cup chopped, roasted Piquillo peppers or Italian roasted red peppers
  • 1 minced shallot
  • 1 tsp hot, smoked Hungarian Paprika
  • 1 tsp crushed Saffron threads
  • 1 tsp sea salt

In a paella pan, saute the above ingredients in olive oil over medium heat until the onions and shallots are soft and translucent. Then add in:

  • 1 cup short grain rice such as Arborio or Bomba
  • 1/2 cup cherry or grape tomatoes, cut into halves
  • 1/2 cup of canned butter beans, drained
  • 1/2 cup blanched haricot vert, cut into one inch lengths

Stir together thoroughy, then add in:

  • 2- 2 1/2 cups of hot broth

Continue cooking the rice blend for about 5 minutes, stirring all the while. As the rice gets a bit thicker, start adding in the proteins from the largest to the smallest, nestling them into the rice mixture. Place the paella pan on the bottom shelf of the oven. Bake for about 20-30 minutes until most of the broth is absorbed, and the rice is just bit al dente. Cover and let rest for about 10- 30 minutes before serving. Having a crusty bottom is considered a good thing. It adds flavor and depth to the dish. Serve with lemon wedges and white or red sangria.

Also visit my Food News column The Huffington Post and my professional website at marilinda.com.

Thanks,

Marilinda

Molasses Oatmeal Cookies with Golden Raisins and Dried Cranberries

 Photo by David Bishop

http://www.dbishop.net/

While perusing the amazing dried fruit display at the new Fairway Market on East 86th street between 2nd and 3rd Avenues in Manhattan NYC, I spotted these gem-like golden raisins.  http://www.fairwaymarket.com/  (There are many locations in the city and in New Jersey.) They inspired me to create a cookie recipe that would highlight their beauty, texture and flavor. Oatmeal Raisin cookies are a healthy classic but their typical color would blend too much with the golden fruit.  I was looking for contrast and drama. I remembered that my photographer friend, David, had been telling me lately how much he loves including molasses in his homemade ice cream and other cooking endeavors because of its rich flavor. I realized that adding it to a cookie recipe would make the color and moistness a perfect backdrop for the juicy yellow raisins as well as adding caramel notes of flavor.

After mixing up a batch of a new cookie recipe I typically cook off two cookies to determine cooking time and temperature, and to evaluate the appearance, texture and flavor. After the first try with this recipe, I decided that I wanted them to spread out more to become thinner and flatter. I added more fat and liquid (egg) to the recipe. I also wanted to brighten the appearance of the cookies with a more jazzy look. I added dried cranberries both for color and flavor, not to mention their major health benefits.  http://www.whfoods.com/genpage.php?tname=foodspice&dbid=145   http://www.cranberryinstitute.org/healthresearch.htm   The tartness of the cranberries are perfect for balancing the richness of the cookie base and the sweetness of the raisins. The finishing touch was sprinkling a pinch of bright white sanding sugar onto each cookie before baking, adding visual dazzle and textural crunch.

I have been using coconut products lately in baking and cooking for their many delicious and healthy properties. Instead of repeating myself here, I invite you to see some of my other posts for more details on the subject, including where to find the ingredients.

http://www.huffingtonpost.com/marilinda-hodgdon/sicilian-pistachio-chocol_b_1128673.html

https://foodfloozie.wordpress.com/2011/11/09/pan-grilled-shrimp-with-lime-zest/

Recipe for Molasses Oatmeal Cookies with Golden Raisins and Dried Cranberries: Preheat oven to 375’F Makes about 2 dozen cookies

Ingredients:

  • 1 cup rolled oats
  • 1 cup Golden raisins
  • 1 cup dried cranberries
  • 1 cup coconut oil, room temperature
  • 1/2 cup salted premium butter, room temperature
  • 1/2 cup coconut sugar
  • 1/2 cup dark brown sugar, or 1/2 cup more coconut sugar
  • 1/2 cup coconut flour
  • 1/2 all purpose flour
  • 1/2 cup dark or black strap molasses
  • 2 eggs
  • 1 teaspoon aluminum free baking soda
  • 1 teaspoon freshly grated ginger, or 1/2 teaspoon ground ginger
  • 1/2 teaspoon ground cinnamon
  • 1/2 teaspoon freshly grated or ground nutmeg
  • 1/2 teaspoon salt
  • Bright white sanding sugar as garnish (found in the baking section of your grocery store)

Directions:

  1. Place the raisins and dried cranberries in a small bowl or glass liquid measuring cup, and just cover them with boiling or very hot water to soften.
  2. In a large bowl, using an electric mixer or a wooden spoon, cream together the sugars (reserving the sanding sugar for garnishing) and fats until homogenous.
  3. Mix in the eggs until smooth.
  4. In a separate medium sized bowl, whisk together the flours and other dry ingredients, including the rolled oats, but not the sanding sugar.
  5. Mix the dry ingredients into the wet ingredients until homogeneous, but not the moistened dried fruits.
  6. Drain the softened dried fruits, reserving the liquid to flavor your favorite beverage.
  7. Fold the drained fruits into the the cookie dough, reserving about 3/4 cup for topping the cookies.
  8. Form the cookies into tablespoon sized balls and slightly flatten them onto the parchment lined baking sheets with your fingers. Be sure to leave enough space between the cookie dough to allow for spreading, at least an inch or so.
  9. Garnish them artfully with the reserved fruit, slightly pressing the fruit into the dough so that it sticks well during baking, then sprinkle each cookie with a bit of sanding sugar.
  10. Bake the cookies for 8-10 minutes until the edges are browned.
  11. Let the cookies cool for at least ten minutes before removing them to a cooling rack with a metal spatula.
  12. After they are cooled completely, enjoy immediately or store them in a covered container.

If you would like to make the recipe gluten and dairy free, replace the butter and  all-purpose flour with coconut oil and coconut flour. The resulting cookies will be a bit more crumbly but equally delicious.

Also visit my Food News Column on the Huffington Post at

http://www.huffingtonpost.com/marilinda-hodgdon/  and my professional website at marilinda.com

Pan Grilled Shrimp with Lime Zest

Photo by David Bishop

http://dbishop.net/

Shellfish, shrimp being one of my favorites, is a spectacular gift of the sea and treasure of the planet. It is one of the lowest calorie animal proteins, 30 calories per ounce, is low in fat, has no saturated fat and offers beneficial cholesterol.  http://www.foodmarketexchange.com/datacenter/industry/article/idf_shrimp_drains.htm

As most world ethnic cuisines tell us, cooking proteins with the bones and shells still attached imparts flavor. Flavor, the all important factor in appetite satiation, drives our sense of abundance and satisfaction with our intake of nutrients and pleasure. Slicing the shrimp in half length wise with the shells still on allows you to clean the vein from the shrimp and season the cut side of the meat. Grilling them shell side down promotes maximum flavor. The grilling shell flavors the flesh with its sweet and musky piquant fragrance.

In pondering how to apply a fine lime zest evenly to the raw shrimp without waste, I realized that drying it would allow ease of sprinkling. To do this I mixed it with fine sea salt and finely ground white pepper. The resulting spice seasoning adds the right balance of brightness, tang and zing needed to make this a thoroughly scrumptious entree or appetizer.

I love cooking with coconut oil. It has such a rich fragrance and flavor, a medium smoke point and zero cholesterol. Yes, the much maligned saturated fat in coconut is indeed now understood to be one of the healthiest oils on the planet. It is said to cure a multitude of human bodily ills and used sparingly won’t add many calories to your food. If you are on a strict no fat diet you can grill the shrimp in a non stick pan without any oil.  http://www.coconutresearchcenter.org/ http://www.organicfacts.net/organic-oils/organic-coconut-oil/health-benefits-of-coconut-oil.html     http://www.huffingtonpost.com/dr-mercola/coconut-oil-benefits_b_821453.html

The secret to easily cutting the shrimp in half lengthwise with a neat and clean look, is using a pair of scissors to cut down the back center line of the shell and the tail. Then, laying the shrimp down on its side, use a very sharp knife to cut the flesh into halves. You’ll get the hang of it with one or two tries.

Lime Zest Seasoning

  • 1 lime, finely zested (Save the juice for your water glasses or beverage of choice)
  • 1 teaspoon fine sea salt
  • 1/2 teaspoon finely ground white pepper

Preparing and Cooking the Shrimp

A half pound of shrimp will feed two people, 120 calories per person without the oil. Coconut oil adds 120 calories per tablespoon to the total pan, much of which gets left in the pan.

  1. Wash and dry the shrimp
  2. Cut the shrimp in half laterally as described above
  3. Pull out the veins if you wish to. I find that sometimes they are less apparent than others.
  4. Sprinkle or spoon and smear the shrimp, cut side up, evenly with the Lime Zest Seasoning
  5. Coat the pan evenly, using a pastry brush, with 1-2 tablespoons of coconut oil
  6. On medium heat, let the skillet heat up until it sizzles a drop of water
  7. Add the shrimp halves to the pan shell side down, keeping track of the order in which you place them down. I have found that usually by the time I have put the last one into the pan it is time to turn the first one.
  8. Turn the shrimp when you see that the shell has turned pink everywhere
  9. Cook the shrimp until they just lose their translucency and remove immediately to a plate. It will only be about a minute. Do Not Over Cook or they will become dry and tough.

It is easy to remove the shell while eating them with a knife and fork, but feel free to eat them with your hands.

Also see my Food News column in The Huffington Post at http://www.huffingtonpost.com/marilinda-hodgdon/  and my professional site at www.marilinda.com


Cod Vin Blanc

Cod Vin Blanc

Photo by David Bishop

http://dbishop.net/

Cod is one of several seafoods, many shellfish included, that has only 30 calories per ounce. It is rich in omega 3’s and is an extremely good source of protein. It is light and flaky, and highly flavorful with a delicately creamy mouth feel. It is easily procured at a fairly low cost, ($9/lb.) is wild caught, and is relatively free of mercury and toxins. It is highly versatile for recipes and has provided nutrition worldwide for centuries.

Beurre Blanc is one of my all time favorite seafood sauces. I totally love Julia Child’s recipe which details how the fat in the butter and acids of the white wine and white wine vinegar, along with other flavoring ingredients such as shallots and capers, emulsify during the initial boiling process to create a delightful syrup, which more butter is than added to, while it cools, to produce the creamy, luxurious sauce. http://labellecuisine.com/archives/Sauces/Julia%20Child%27s%20Classic%20Sauce%20Beurre%20Blanc.htm

Butter, though thoroughly delicious and wonderful in recipes and for health, used sparingly (butter is rich in both essential and non essential amino acids), can be fattening when used too frequently. http://en.wikipedia.org/wiki/Essential_amino_acid  and  http://nutritiondata.self.com/facts/dairy-and-egg-products/0/2

I came up with a recipe that uses olive oil in place of butter. It is rich and flavorful, with less than half the calories of a traditional Beurre Blanc. More flavor, less calories, more satisfaction, less cravings…This is my mission.

My recipe for Cod alla Vin Blanc (alias Cod Beurre Blanc alla Olive Oil) combines these two loves of my life, with some change ups. It is an easy and fast one pan rendition, that is both healthy and calorie conscience, while being seductive to the eyes.

Recipe for Cod Vin Blanc: Serves 2 (214-272 calories per person)

Ingredients:

  • 6-8 ounces cod filet, thick cut-30 calories/ounce
  • 1/4 cup small julienned onions or shallots-24 calories
  • 1/8 cup dry white wine-about 90 calories
  • 1/8 cup white wine vinegar-0 calories
  • 1/8 cup of water-0 calories
  • 1 Tablespoon olive oil -130 calories
  • 1 Tablespoon capers in white wine vinegar, drained of liquid- 0 calories
  • 1 Tablespoon grated carrot, for sweetness and color- 2-3 calories
  • 1 teaspoon grated fresh ginger- 1/3 of a calorie
  • 1/4 teaspoon sea salt- 0 calories
  • 1/4 teaspoon flaked dried red hot pepper- o calories

Directions:

  1. In a non stick, non coated skillet with a fitted lid, add in all of the ingredients, laying in the cod filet last. Put the lid on.
  2. Heat the pan to medium until it starts to boil. Reduce the heat as necessary to make the boil moderate.
  3. As the liquid steams the fish, bast it occasionally with a spoon throughout  the cooking process, about 7 minutes, depending on the thickness of the fish filet. Carefully check it with a fork  in the center to make sure it is just cooked. The cod fish will flower into wonderful flakiness as it steams. Do not over cook the fish or it will become rubbery and tasteless.
  4. With a slotted spatula, remove the fish from the pan, draining it as well as you can from the liquid, onto a the serving plate.
  5. Continue to cook the liquid in the pan until it becomes a syrupy sauce texture in thickness, if it is not already.
  6. Serve the sauce over the fish.
  7. Enjoy it with a good glass of white wine.

There is no need for additional garnish as the ingredients make a spectacular look on the flowered flaky cod. The flavor is amazing.

Also see my food column on the Huffington Post at http://www.huffingtonpost.com/marilinda-hodgdon/  and my professional site at www.marilinda.com

Asparagus with Shallots and Lemon

 Photo by David Bishop

http://www.dbishop.net/

I have loved asparagus since I was a small child. My mother served it often with butter and salt & pepper. In my adult years, upon discovering shallots and the wonders of fresh lemon juice and zest , I have been making my recipe for Asparagus with Shallots and Lemon for many years. The first time I took a plate of this dish to a neighborhood buffet dinner party, the plate was emptied immediately. People were asking me for the recipe because they loved it so much. I went back home and made another platter of it to bring back to the party. Mine was the only vegetable dish, aside from a green salad, the others being popular heavy meat, cheese and starch foods. I was delighted with my recipe’s reception.

Asparagus, with it’s delicate flavor and tender succulent flesh, has been prized as a delicacy since ancient times, especially in Ancient Egypt, Rome and Greece, and was and still is known for its cleansing and healing properties.  Asparagus has often appeared in high brow recipes such as Asparagus alla Hollandaise, though in modern times has become ubiquitous in food markets and is easily procured at modest means. It is a pantheon of health foods with high fiber and nutrients, and has a low calorie count of 36 calories per cup. It can be useful both as cure and preventative for disease.

According to the Michigan Asparagus Advisory Board, “Asparagus is one of the most nutritionally well-balanced vegetables in existence. It leads nearly all produce items in the wide array of nutrients it supplies in significant amounts for a healthy diet.” (http://www.asparagus.org/maab/nutrition.html). Wikipedia sites that “Studies have shown that people who have died from Alzheimer’s Disease have extremely low to no levels of folate”, folate being one of the important nutrients in asparagus, among many others. (http://en.wikipedia.org/wiki/Asparagus)

Other experts agree that asparagus is high in antioxidants and amino acids, has little fat and high protein, is low in sodium and is a diuretic. Furthermore, it is also a great source for: calcium, magnesium, zinc, folic acid, thiamin, riboflavin, rutin, niacine, glutathione, (http://www.doctoroz.com/videos/superhero-antioxidants-pt-1, http://www.amazing-glutathione.com/what-foods-have-glutathione. html, http://www.effectsofglutathione.com/), iron, phosphorus, potassium, copper, manganese, selenium, and chromium, “a trace mineral that enhances the ability of insulin to transport glucose from the bloodstream into cells.” (http://en.wikipedia.org/wiki/Asparagus) This last tidbit is especially useful for diabetics.

Asparagus is especially known to cleanse the liver and kidneys  It is also found to help cure gout by dissolving uric acid in the the extremities, and help in bowel evacuation. Water from cooking asparagus is considered to alleviate facial blemishes.

There is much scientific research on the matter of how asparagus makes your pee odorous. After having read them all I still believe that it is it’s property of cleansing the liver and kidneys that causes the phenomenon. Asparagus simply makes your pee smell because it releases the accumulated toxins from your body.

I share with you here my recipe for Asparagus with Shallots and Lemon.

Recipe serves 4 as a side dish: 54 calories per serving

  • 1 bunch of asparagus, about 8 ounces or 2 cups, 72 calories
  • 2 shallots, thinly sliced, 1.75 – 2 ounces, 14-16 calories
  • I lemon, zested and juiced, zest is 3 calories per Tablespoon, juice is 8- 10 calories for 1.75 ounces. I used a Meyers lemon for the rich color and sweeter taste.
  • 1 tablespoons olive oil, 120 calories
  • Flake sea salt and ground black pepper to taste, as a finish
  • 2 quarts of boiling sea salted water (about 1/8 cup all purpose sea salt)
  • 2 quarts of ice water in a large bowl
  1. Trim the pale woody ends off the stalks of the washed asparagus. (You can use the ends to make vegetable stock later with trimmings of other vegetables)
  2. Boil the asparagus tips until they are just about tender to the teeth. (I bite the largest cut end of one to check)
  3. Remove the asparagus from the boiling water and place into the ice bath to preserve the bright green color. Drain and dry them thoroughly just before the finished cooking process.
  4. In a skillet amply sized to accommodate all of the asparagus single file, saute the shallots in the olive oil on medium low heat until slightly golden brown.
  5. Add into the skillet the drained and dried asparagus and stir to coat them with the oil and shallots.
  6. Add into the skillet the lemon juice and half of the lemon zest and continue to cook for a few minutes, tossing all the while. The juices and oil will emulsify to form a glaze.
  7. Remove everything to a plate with tongs and season with flaked sea salt and freshly ground pepper to taste.
  8. Garnish with the rest of the lemon zest.

Serve and enjoy as a side dish with your favorite entree and whole grain, or add to a salad.

Also visit my professional website at  www.marilinda.com and my food column on the Huffingon post at http://www.huffingtonpost.com/marilinda-hodgdon/

Chocolate Cupcake with Mocha Cream

Photo by David Bishop

http://dbishop.net

When you hear the words “Chocolate” and “Cream”, what comes to mind is moist, rich heavenliness. What we don’t think of is frugality in the “calorie and fat” department. To have both at the same time is in fact “To Have Your Cake and Eat It Too”. I strive to create scrumptious food that is exemplary as tasty delight and healthy choice. Flavor and texture are the primary elements that drive excellence in the culinary experience. The highest quality and purist ingredients comprise the muse components as inspiration for creating delectable recipes. My years of experimentation with a multitude of products has given me a broad palette for discovery in this endeavor.

I present to you here a recipe for Chocolate Angel Food Cupcakes with Mocha Cream that will knock your socks off…your shoes and pants too…But you can leave your hat on. (As per Joe Cocker’s song lyrics)

I have included calorie counts for all of the ingredients used in the recipe. Having totaled and divided for per serving consumption, each cup cake has about 58 calories. Using 1/8 cup of the Mocha Cream for each at 19 calories, the grand total per serving is a mere and astounding 77 calories, with none of it from fat.

Angel Food Cup Cake Recipe- pre-heat oven to 375′ F

  • 3/4 cup Coconut Crystal Sugar (from your local health food store), 180 cal
  • 1 cup unsweetened Cocoa Powder, 197 cal
  • 1/3 cup water, 0 cal
  • 1/4 tsp salt, 0 cal

Heat the ingredients together in a sauce pan until they are dissolved and smooth of lumps. Let cool.

  • 1/4 cup all purpose flour, 100 cal
  • 2 teaspoons Baking Powder (I use aluminum free brands), 0 cal

Whisk together flour and baking powder in a small bowl and set aside.

  • 1/4 cup Meringue Powder (powdered egg whites), 60 cal
  • 1/2 cup Water, 0 cal
  • 2 Teaspoons Pure Vanilla Extract, 40 cal
  1. Beat the meringue powder, water and vanilla extract with an electric mixer on high until soft peaks form, about 5 minutes.
  2. On a lower speed, mix in the chocolate sugar syrup.
  3. Gradually mix in the dry flour mixture.
  4. Pour batter equally into about 8 – 10 paper lined cupcake pan portions.
  5. Bake for 10 – 12 minutes until a pick comes out cleanly. Let cool while you make the Mocha Cream.

Mocha Cream

  • 2 cups 0% fat Greek Yogurt, 260 cal
  • 1/2 cup Coconut Crystal Sugar, 120 cal
  • 1/2 cup Unsweetened Cocoa Powder, 98.5 cal

Whisk together in a small bowl until smooth and set aside.

  • 1 cup very strong Espresso Coffee, 0 cal
  • 1/2 cup Meringue Powder, 120 cal
  • 1/2 teaspoon Pure Vanilla Extract, 10 cal
  1. Beat together the meringue powder, coffee and vanilla with an electric mixer on high speed until soft peaks form.
  2. Lower the speed and mix in the Mocha Yogurt mixture.
  3. Using a pastry bag with a # 2 tip (about 3/8″ diameter), poke the cupcakes in the center almost to the bottoms to fill the interiors and cover the tops with the Mocha Cream, about 1/8 cup per cupcake.
  4. There will be lots of Mocha Cream left over. It stores covered in the refrigerator for days. It can be re-whipped to use it again.

Enjoy your low cal, no fat, chocolatey dessert with or without your hat on.

Also check out my professional web site at www.marilinda.com and my food column at  http://www.huffingtonpost.com/marilinda-hodgdon/

Arctic Char Marinated on Ice

Photo by David Bishop

See David’s link at http://www.dbishop.net

Marinating fish, whether whole, filleted, steak cut or chopped, is one of the tastiest ways to take advantage of seafood’s sweet and tender flaky flesh. Marinades not only impart flavor to food, they preserve moisture and tenderness. Add delicate vegetables and herbs to a palette of sweet, savory, salty, spicy and acidic liquids and seasonings to a fish filled oven proof covered baking dish, and bake gently for a foolproof ragoût de poisson.

Pictured here, the Arctic Char, vegetable and marinade presentation is being readied for the baking dish and oven. The beautifully colored whole fish was scaled and cleaned by the fish market, leaving the head and tail on for an elegant service. The cavity is stuffed with thinly sliced lemons and red onions for flavor and color.

I have been told more than once that this combination of fish, marinade and condiments is one of the best ever tasted. The marinade is a blend of high quality Mirin (Naturally sweet Japanese sake wine-Avoid using the cheap artificially sweetened corn syrup imitation), soy sauce, olive oil, toasted sesame oil, and Sambal Oelek Ground Fresh Chile Paste & Siracha Hot Chili Sauce (Chinese pepper vinegar preparations available in the Asian section of your grocery store). For amazing dazzle, sprinkle with sliced scallions, slivered fresh ginger, capers, dill, baby Funnel Chanterelle mushrooms (also known as yellowfoot or winter mushroom) and Maldon Natural Sea Salt Flakes.

If you don’t have a lid for your baking dish, cover the fish with a sheet of parchment paper and seal the dish with aluminum foil. I don’t like to let the foil touch the food to avoid adding aluminum residue, especially when acid is present in the food.

Recipe: Serves 4-6 (All measures are approximate and can easily be adjusted to your needs and taste)

Fish:

  • One fresh whole cleaned 3-4 Lb. fish with head and tail; Arctic Char, Salmon, Bass, Grouper, Snapper, etc.

Stuffing:

  • 1/2 thinly sliced lemon
  • 1/2 thinly sliced red onion

Marinade: Whisk together

  • 1/2 cup Mirin
  • 1/4 cup olive oil
  • 1/8 cup soy sauce
  • 1/8 cup toasted sesame oil
  • 1 Tablespoon Sambal Oelek Chile Paste
  • 1 Teaspoon Siracha Hot Chili Sauce

Flavor Garnish:

  • 1 cup baby Funnel Chantrelle Mushrooms, or your favorite mushroom
  • 1/4 cup sliced scallions
  • 1/4 cup capers
  • 1/4 cup fresh dill leaves, torn
  • 1/8 cup slivered fresh ginger
  • Pinches of sea salt flakes

Directions: Pre-heat oven to 350′ F

  1. Wash and dry cleaned fish
  2. Prepare marinade
  3. Rub marinade into the cavity of the fish
  4. Stuff the cavity of the fish with lemons and onion slices, alternating them
  5. Pour a bit of the marinade into the baking dish, just coating the bottom so the fish won’t stick
  6. Pour the marinade over the fish
  7. Sprinkle the flavor garnish over the fish and baking dish
  8. Cover the fish and dish with parchment paper
  9. Seal the baking dish with foil, or cover it with a fitting lid
  10. Bake for about 20 minutes for a larger fish and less for a smaller fish. Do not over cook. The fish should be just flaky and moist.
  11. Serve topped with excess marinade and flavor garnish as needed

Also see my food news column in the Huffington Post under Life & Style/Food at http://www.huffingtonpost.com/marilinda-hodgdon/