Feeds:
Posts
Comments

Archive for July, 2011

Cheese Burger in Paradise

Photo by David Bishop

No backyard barbecue or summer party is complete without the quintessential All-American Burger. Though burgers are ubiquitous in America they are not always divine. Careful attention to detail of every ingredient is the secret to making truly great burgers, both for taste and for visual appeal.

Start with the bun. It should be as fresh and delicious as possible, preferably baked that day. Whichever is your favorite, plain or seeded, egg or potato dough, a bit of grilled toasting on the insides will add another layer of flavor. Try brushing the grill side of the bread with butter, mayonnaise or mustard for greater intensity.

So many times I see meat patties disproportionate to the size of the bun. It is essential for flavor distribution as well as artful compositional balance that the patty be formed with careful consideration of the bun size and shape.  It is especially important that the patty spans at least, but not much more than, the diameter of the bun. Taking that first anticipatory bite only to find yourself with merely a mouthful of bun and condiments is such a let down. I like to have the “meat” of the sandwich, whether it is really meat, a savory vegetable patty or a succulent grilled marinated portobello mushroom, in every bite. The first rule of thumb in making it so, is that meat patties tend to puff thicker and shrink in diameter when cooked. Ergo, when forming your patty, make it thinner and wider than you intend for it to be when finished cooking.  When I do them for film, I do a test patty, weighing and measuring the before and after to find the optimum raw size. I have also found that ground beef at about 85% makes both a very juicy burger and a patty that cracks and deforms the least. I always make sure that the edges (only the edges) are compressed well while forming the patties to help minimize cracking and to hold in the juices.

We all adore flame grilled barbecue flavor. If you don’t have access to outdoor space, electric grills are available or try using your broiler. If the sides don’t get the char you would like, take a propane or butane torch to them. Available at your local hardware store, small hand held torches are handy for many kitchen cooking tasks. As with any indoor flaming, be sure to have proper ventilation.

To really make a superb meat patty, try seasoning the ground meat before you form the patty for extra flavor. Salt, pepper, or one of my favorites, sauteed minced shallot, make a great start. Add whatever seasoning you like best, just don’t make the bits too big. Cheese, peppers, eggs, bread crumbs, herbs, spices, dried fruit, vegetables…all are eligible innovations at the right place and time.

Whether they are old stand-by’s or new favorites, condiments, like the patty and bread, need to be of the freshest, ripest and best quality, and be distributed evenly over the sandwich for admirable results. Go wild and grill up some thinly sliced juicy ripe pineapple, slather with scallion, jalepeno & nutmeg laced mayonnaise, and add fresh cilantro sprigs to a chicken, turkey, crab or shrimp burger.

I particularly like to put the big three saucy burger toppings, ketchup, mustard and mayonnaise, in squeeze bottles for easy application. I find store bought ketchup & mustard sometimes too runny, so I drain them first. Just empty the bottle or jar onto a sheet pan lined with about 10 layers of paper towels and wait about 10 to 20 minutes. The ketchup or mustard closest to the toweling will be thicker. Using a rubber or metal spatula, scrape the contents off the tray into a bowl and whisk until homogenous. Empty the bowl into a zip lock bag, sealing the zipper and cutting a little off one bottom corner, then ease the contents into the squeeze bottle. The mayonnaise has a little bit different story. I find off the shelf jars of it to be lumpy. I empty the jar into a bowl and whisk the mayonnaise until smooth, then fill the squeeze bottle like I do the others.

There are no hard and fast rules. It’s all about what you and your audience like. I am happy to answer any questions you might have at http://www.marilindahodgdon@gmail.com

Also check out my articles on the Huffington Post at http://www.huffingtonpost.com/marilinda-hodgdon/  and my professional web site at www.marilinda.com

Read Full Post »

Puff Pastry Cherry Pie

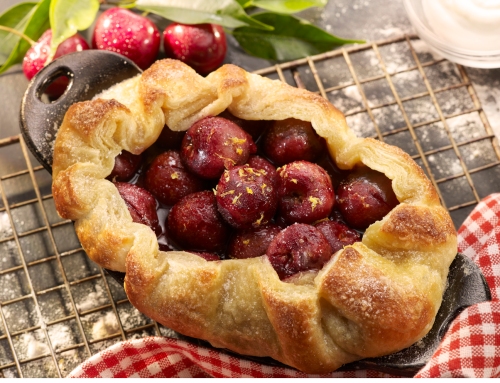
Photo by David Bishop

A box of frozen puff pastry sheets from the store is one of my favorite go tos for creating easy and beautiful, delicious confections. Add some seasonal fresh fruit to the rich and buttery pastry, and voila, a treat everyone will love. Cherries macerated in cognac and sugar elevate this dessert to elegant status, while topping it with semi sweet whipped cream or vanilla ice cream makes it irresistible.

The amount of cherries you need depends on the size of your dish. Test the amount you need in the pan you choose to use. Pit about two cups of cherries. This is made enormously easier with a sweet little gadget I found at both Bed, Bath and Beyond and at Sur La Table, made by Progressive. It pits 4 cherries at a time cleanly and neatly with the push of the lid and without staining your fingers and kitchen surfaces  Mix the cherries into a medium size bowl with 1/4 cup of cognac, a tablespoon of sugar and a teaspoon of all purpose flour. Let it sit for at least 15 minutes.

While the cherries are soaking up the good stuff take the time to prepare the pastry. Following package directions, take out only as much pastry you will use, one sheet in my case. Seal the rest and store in the freezer until you need it next. Lightly flour your working surface and the pastry sheet and cover it with a dish towel while it thaws, about 1/2 hour.

Choose a baking vessel that is appropriate in size and style for the occasion. I used a pre-seasoned cast iron Au Gratin baking dish From Sur La Table to make a pie for two. Trace the outline of your dish on a piece of paper and add two inches diameter for the crust. Cut out the paper form and lay it onto the pastry. If your form is bigger than the sheet of pastry, you may need to roll the pastry out a bit with a rolling pin, making sure you sprinkle flour as needed to prevent the pastry from sticking to your rolling pin, surface or hands. Cut the pastry oval out with the tip of a very sharp knife, tracing the paper, and lay it evenly over the baking dish. Gently form it to the bottom and sides.

Fill the pastry with the cherry mixture, including the liquid, piling it high. Form the edges around it. Beat an egg with a teaspoon of milk and brush the pastry top. Sprinkle both the pastry and the cherries with about a tablespoon of granulated sugar. Bake it in a preheated at 425’F oven for about 10 minutes until it is puffed and browned. To prevent over browning while finishing the internal cooking, turn the heat down to 325’F and bake for another 10 minutes.

Garnish with lemon zest when cooled.

Styling Tips

  • Before baking, use a thermometer to validate the oven’s temperature. If the thermometer is new, check it against two other thermometers. Most ovens aren’t accurate to the dial settings.
  • A pizza stone helps keep the oven temperature from fluctuating wildly, which most ovens do. Adjust a shelf to the middle of the oven and place the stone on it while the oven is cold, to prevent breakage.
  • Make sure the oven achieves 425’F before putting the pie in the center on the stone. The stone will also help the bottom crust cook thoroughly and prevent sogginess.

Check out my new column with the Huffington Post at http://www.huffingtonpost.com/marilinda-hodgdon/ and my professional site at http://www.marilinda.com

Read Full Post »

Roasted Quail on Crispy Pasta Nest

Photo by David Bishop

Quail is one of my favorite poultry choices. The meat is delicate in both texture and flavor. Most quail available for purchase is boned except for the legs and wings. I used a half of apricot to plump up the breast for structure, flavor and juiciness. Using white sewing thread, I stitched the opening and trussed the legs. The cute little birds are seasoned with white pepper, seared in butter and roasted at 400′ F for about 15 minutes, glazing with a pastry brush during cooking at least 3 times, until browned and tender. I usually brine poultry before cooking for flavor and tenderness. If you choose to do this, be sure to brine the meat before it is stuffed and dry it well. As an appetizer use one bird per person. For an entree 2-3 birds each.

I chose to present the quail as an appetizer on a nest of fried spaghetti for drama, and garnished with pine nuts, fried zucchini flower, chervil and sauteed apricot pieces.

Brine

  • 1 gallon of water
  • 1 cup sea salt
  • 1 small onion cut into pieces (optional)

Dissolve the salt and chill the solution. Soak the quail for one hour in the refrigerator, making sure they are completely covered . Dry thoroughly before stuffing.

Glaze

  • 2 cups freshly squeezed orange juice with pulp
  • 1 cup honey

Whisk the juice and honey together. In a sauce pan reduce the mixture over medium heat by half, being careful not to scorch, Brush it on the quail before, during and after roasting. Roast on a parchment lined 1/2 sheet pan at 400’F for about 15 minutes, until browned and tender. Serve with the remaining glaze.

Also, check out my Huffington post site at http://www.huffingtonpost.com/marilinda-hodgdon/

Read Full Post »