Feeds:
Posts
Comments

Archive for the ‘Party Ideas’ Category

Photo by David Bishop

http://dbishop.net/

The first time I had a really great paella was in Majorca Spain, where every kind of seafood available could be obtained freshly caught, having never been frozen. The flavor and texture is incomparable to our once frozen varieties. The shrimp and baby squid quite literally melted in my mouth. My Uncle Nick had an apartment there in town over looking the marina. Two friends of mine and I were visiting with him for the Christmas and New Year’s holidays. He prepared for us an incredible paella, taking no short cuts, making his stock from scratch.

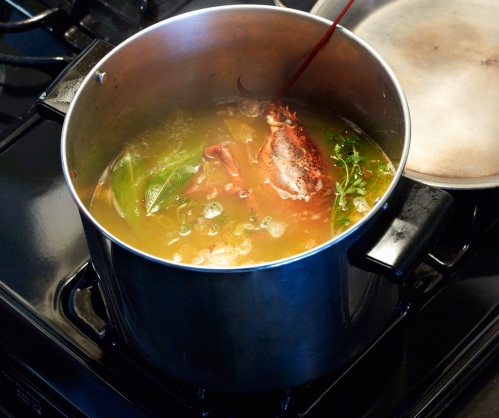
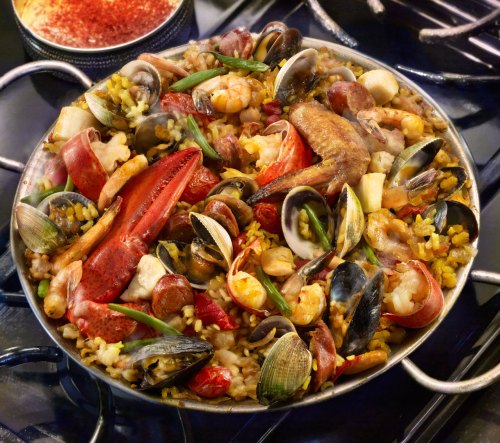
In my version, seen above, I did my best to recreate the flavors and textures I remembered from Spain. I did take a tiny short cut in buying organic free range chicken stock and clam juice, which I enhanced by boiling it down with chicken wings, a lobster head, shrimp shells, a whole carrot, onion and celery stalk, a couple of bay leaves, a few sprigs of thyme, and a pinch of saffron.

Photo by David Bishop

My photographer friend, David, and I went to a Spanish Restaurant in NYC, El Charro Español, which specializes in paella while we were researching to write and shoot this post, and help me come up with my recipe. I ordered the seafood paella and he ordered the Paella Valenciana, which also included seafood and featured chicken and chorizo, a smoky, spicy sausage. I usually don’t eat pork products due to the high Triglyceride levels, but when I tasted what a difference it made in the flavor of David’s rice compared to mine, I was sold on chorizo in paella as a must. We borrowed a paella pan with the generosity of Luis, the owner of the restaurant. I am told that the pan can make all the difference, but that the most important thing is the proportion of the broth to the rice, and of course the flavor of the broth.

Pre-heat the oven to 450’F and place a shelf close to the bottom of the oven

Meat and Seafood Ingredients:

  • 1 small live lobster-remove the head and small legs for the stock. Cut the tail into 1 inch pieces, leaving the shell on.
  • 4 chicken wings, browned on both sides in plenty of canola oil in a skillet-use 2 for the stock.
  • 12 tiny clams, scrubbed and sorted to ensure that they are alive (I prefer Cockles. They are ridged and have a green tint).
  • 1/2 lb. medium shrimp- use the shells for the stock (and heads if you can get them that way).
  • 1/4 lb. small mussels, scrubbed and sorted.
  • 1/4 lb. sea scallops-cut into quarters
  • 1 eight inch chorizo sausage-sauteed in the same pan with the chicken, then cut into 3/4″ inch thick rounds.

Prepare the seafood and refrigerate until you are ready to put them into the paella pan. Set aside the cooked chicken and chorizo.

Broth:

  • 1 quart of organic free range chicken stock
  • 1 pint of clam juice
  • 1 cup of dry white wine
  • 1   8 oz. can of crushed San Marzano tomatoes
  • 2  chicken wings, browned on both sides as said above
  • 1 lobster head
  • shrimp shells
  • 1 large onion, washed and quartered
  • 1 whole carrot, scrubbed
  • 1 celery stalk, scrubbed
  • 3 bay leaves
  • 3 sprigs of thyme
  • 1 teaspoon crushed saffron fibers

Boil the broth ingredients until it reduces to about half of the volume, or until you need to use it. Strain out the bits and discard them.

Vegetable & Rice ingredients:

  • 1/2 cup chopped onion
  • 1/2 cup chopped, roasted Piquillo peppers or Italian roasted red peppers
  • 1 minced shallot
  • 1 tsp hot, smoked Hungarian Paprika
  • 1 tsp crushed Saffron threads
  • 1 tsp sea salt

In a paella pan, saute the above ingredients in olive oil over medium heat until the onions and shallots are soft and translucent. Then add in:

  • 1 cup short grain rice such as Arborio or Bomba
  • 1/2 cup cherry or grape tomatoes, cut into halves
  • 1/2 cup of canned butter beans, drained
  • 1/2 cup blanched haricot vert, cut into one inch lengths

Stir together thoroughy, then add in:

  • 2- 2 1/2 cups of hot broth

Continue cooking the rice blend for about 5 minutes, stirring all the while. As the rice gets a bit thicker, start adding in the proteins from the largest to the smallest, nestling them into the rice mixture. Place the paella pan on the bottom shelf of the oven. Bake for about 20-30 minutes until most of the broth is absorbed, and the rice is just bit al dente. Cover and let rest for about 10- 30 minutes before serving. Having a crusty bottom is considered a good thing. It adds flavor and depth to the dish. Serve with lemon wedges and white or red sangria.

Also visit my Food News column The Huffington Post and my professional website at marilinda.com.

Thanks,

Marilinda
Read Full Post »

Pan Grilled Shrimp with Lime Zest

Photo by David Bishop

http://dbishop.net/

Shellfish, shrimp being one of my favorites, is a spectacular gift of the sea and treasure of the planet. It is one of the lowest calorie animal proteins, 30 calories per ounce, is low in fat, has no saturated fat and offers beneficial cholesterol.  http://www.foodmarketexchange.com/datacenter/industry/article/idf_shrimp_drains.htm

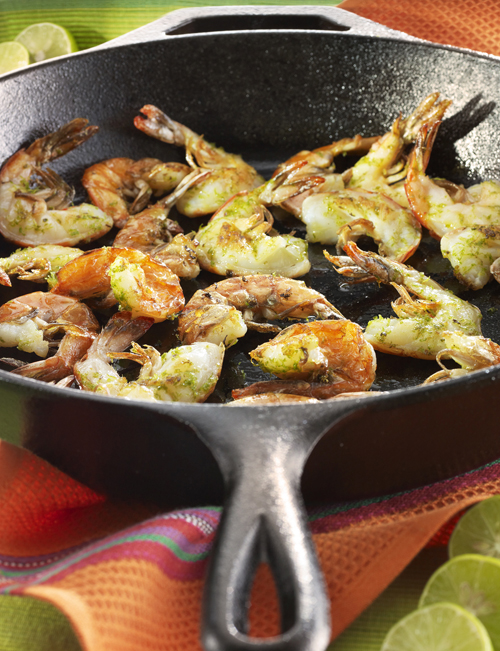
As most world ethnic cuisines tell us, cooking proteins with the bones and shells still attached imparts flavor. Flavor, the all important factor in appetite satiation, drives our sense of abundance and satisfaction with our intake of nutrients and pleasure. Slicing the shrimp in half length wise with the shells still on allows you to clean the vein from the shrimp and season the cut side of the meat. Grilling them shell side down promotes maximum flavor. The grilling shell flavors the flesh with its sweet and musky piquant fragrance.

In pondering how to apply a fine lime zest evenly to the raw shrimp without waste, I realized that drying it would allow ease of sprinkling. To do this I mixed it with fine sea salt and finely ground white pepper. The resulting spice seasoning adds the right balance of brightness, tang and zing needed to make this a thoroughly scrumptious entree or appetizer.

I love cooking with coconut oil. It has such a rich fragrance and flavor, a medium smoke point and zero cholesterol. Yes, the much maligned saturated fat in coconut is indeed now understood to be one of the healthiest oils on the planet. It is said to cure a multitude of human bodily ills and used sparingly won’t add many calories to your food. If you are on a strict no fat diet you can grill the shrimp in a non stick pan without any oil.  http://www.coconutresearchcenter.org/ http://www.organicfacts.net/organic-oils/organic-coconut-oil/health-benefits-of-coconut-oil.html     http://www.huffingtonpost.com/dr-mercola/coconut-oil-benefits_b_821453.html

The secret to easily cutting the shrimp in half lengthwise with a neat and clean look, is using a pair of scissors to cut down the back center line of the shell and the tail. Then, laying the shrimp down on its side, use a very sharp knife to cut the flesh into halves. You’ll get the hang of it with one or two tries.

Lime Zest Seasoning

  • 1 lime, finely zested (Save the juice for your water glasses or beverage of choice)
  • 1 teaspoon fine sea salt
  • 1/2 teaspoon finely ground white pepper

Preparing and Cooking the Shrimp

A half pound of shrimp will feed two people, 120 calories per person without the oil. Coconut oil adds 120 calories per tablespoon to the total pan, much of which gets left in the pan.

  1. Wash and dry the shrimp
  2. Cut the shrimp in half laterally as described above
  3. Pull out the veins if you wish to. I find that sometimes they are less apparent than others.
  4. Sprinkle or spoon and smear the shrimp, cut side up, evenly with the Lime Zest Seasoning
  5. Coat the pan evenly, using a pastry brush, with 1-2 tablespoons of coconut oil
  6. On medium heat, let the skillet heat up until it sizzles a drop of water
  7. Add the shrimp halves to the pan shell side down, keeping track of the order in which you place them down. I have found that usually by the time I have put the last one into the pan it is time to turn the first one.
  8. Turn the shrimp when you see that the shell has turned pink everywhere
  9. Cook the shrimp until they just lose their translucency and remove immediately to a plate. It will only be about a minute. Do Not Over Cook or they will become dry and tough.

It is easy to remove the shell while eating them with a knife and fork, but feel free to eat them with your hands.

Also see my Food News column in The Huffington Post at http://www.huffingtonpost.com/marilinda-hodgdon/  and my professional site at www.marilinda.com


Read Full Post »

Asparagus with Shallots and Lemon

 Photo by David Bishop

http://www.dbishop.net/

I have loved asparagus since I was a small child. My mother served it often with butter and salt & pepper. In my adult years, upon discovering shallots and the wonders of fresh lemon juice and zest , I have been making my recipe for Asparagus with Shallots and Lemon for many years. The first time I took a plate of this dish to a neighborhood buffet dinner party, the plate was emptied immediately. People were asking me for the recipe because they loved it so much. I went back home and made another platter of it to bring back to the party. Mine was the only vegetable dish, aside from a green salad, the others being popular heavy meat, cheese and starch foods. I was delighted with my recipe’s reception.

Asparagus, with it’s delicate flavor and tender succulent flesh, has been prized as a delicacy since ancient times, especially in Ancient Egypt, Rome and Greece, and was and still is known for its cleansing and healing properties.  Asparagus has often appeared in high brow recipes such as Asparagus alla Hollandaise, though in modern times has become ubiquitous in food markets and is easily procured at modest means. It is a pantheon of health foods with high fiber and nutrients, and has a low calorie count of 36 calories per cup. It can be useful both as cure and preventative for disease.

According to the Michigan Asparagus Advisory Board, “Asparagus is one of the most nutritionally well-balanced vegetables in existence. It leads nearly all produce items in the wide array of nutrients it supplies in significant amounts for a healthy diet.” (http://www.asparagus.org/maab/nutrition.html). Wikipedia sites that “Studies have shown that people who have died from Alzheimer’s Disease have extremely low to no levels of folate”, folate being one of the important nutrients in asparagus, among many others. (http://en.wikipedia.org/wiki/Asparagus)

Other experts agree that asparagus is high in antioxidants and amino acids, has little fat and high protein, is low in sodium and is a diuretic. Furthermore, it is also a great source for: calcium, magnesium, zinc, folic acid, thiamin, riboflavin, rutin, niacine, glutathione, (http://www.doctoroz.com/videos/superhero-antioxidants-pt-1, http://www.amazing-glutathione.com/what-foods-have-glutathione. html, http://www.effectsofglutathione.com/), iron, phosphorus, potassium, copper, manganese, selenium, and chromium, “a trace mineral that enhances the ability of insulin to transport glucose from the bloodstream into cells.” (http://en.wikipedia.org/wiki/Asparagus) This last tidbit is especially useful for diabetics.

Asparagus is especially known to cleanse the liver and kidneys  It is also found to help cure gout by dissolving uric acid in the the extremities, and help in bowel evacuation. Water from cooking asparagus is considered to alleviate facial blemishes.

There is much scientific research on the matter of how asparagus makes your pee odorous. After having read them all I still believe that it is it’s property of cleansing the liver and kidneys that causes the phenomenon. Asparagus simply makes your pee smell because it releases the accumulated toxins from your body.

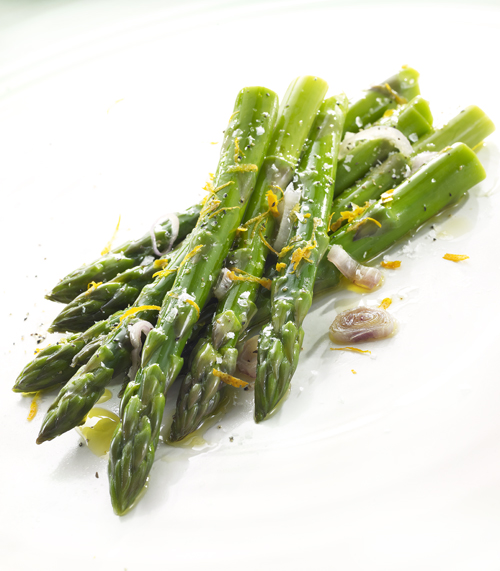
I share with you here my recipe for Asparagus with Shallots and Lemon.

Recipe serves 4 as a side dish: 54 calories per serving

  • 1 bunch of asparagus, about 8 ounces or 2 cups, 72 calories
  • 2 shallots, thinly sliced, 1.75 – 2 ounces, 14-16 calories
  • I lemon, zested and juiced, zest is 3 calories per Tablespoon, juice is 8- 10 calories for 1.75 ounces. I used a Meyers lemon for the rich color and sweeter taste.
  • 1 tablespoons olive oil, 120 calories
  • Flake sea salt and ground black pepper to taste, as a finish
  • 2 quarts of boiling sea salted water (about 1/8 cup all purpose sea salt)
  • 2 quarts of ice water in a large bowl
  1. Trim the pale woody ends off the stalks of the washed asparagus. (You can use the ends to make vegetable stock later with trimmings of other vegetables)
  2. Boil the asparagus tips until they are just about tender to the teeth. (I bite the largest cut end of one to check)
  3. Remove the asparagus from the boiling water and place into the ice bath to preserve the bright green color. Drain and dry them thoroughly just before the finished cooking process.
  4. In a skillet amply sized to accommodate all of the asparagus single file, saute the shallots in the olive oil on medium low heat until slightly golden brown.
  5. Add into the skillet the drained and dried asparagus and stir to coat them with the oil and shallots.
  6. Add into the skillet the lemon juice and half of the lemon zest and continue to cook for a few minutes, tossing all the while. The juices and oil will emulsify to form a glaze.
  7. Remove everything to a plate with tongs and season with flaked sea salt and freshly ground pepper to taste.
  8. Garnish with the rest of the lemon zest.

Serve and enjoy as a side dish with your favorite entree and whole grain, or add to a salad.

Also visit my professional website at  www.marilinda.com and my food column on the Huffingon post at http://www.huffingtonpost.com/marilinda-hodgdon/

Read Full Post »

Cheese Burger in Paradise

Photo by David Bishop

No backyard barbecue or summer party is complete without the quintessential All-American Burger. Though burgers are ubiquitous in America they are not always divine. Careful attention to detail of every ingredient is the secret to making truly great burgers, both for taste and for visual appeal.

Start with the bun. It should be as fresh and delicious as possible, preferably baked that day. Whichever is your favorite, plain or seeded, egg or potato dough, a bit of grilled toasting on the insides will add another layer of flavor. Try brushing the grill side of the bread with butter, mayonnaise or mustard for greater intensity.

So many times I see meat patties disproportionate to the size of the bun. It is essential for flavor distribution as well as artful compositional balance that the patty be formed with careful consideration of the bun size and shape.  It is especially important that the patty spans at least, but not much more than, the diameter of the bun. Taking that first anticipatory bite only to find yourself with merely a mouthful of bun and condiments is such a let down. I like to have the “meat” of the sandwich, whether it is really meat, a savory vegetable patty or a succulent grilled marinated portobello mushroom, in every bite. The first rule of thumb in making it so, is that meat patties tend to puff thicker and shrink in diameter when cooked. Ergo, when forming your patty, make it thinner and wider than you intend for it to be when finished cooking.  When I do them for film, I do a test patty, weighing and measuring the before and after to find the optimum raw size. I have also found that ground beef at about 85% makes both a very juicy burger and a patty that cracks and deforms the least. I always make sure that the edges (only the edges) are compressed well while forming the patties to help minimize cracking and to hold in the juices.

We all adore flame grilled barbecue flavor. If you don’t have access to outdoor space, electric grills are available or try using your broiler. If the sides don’t get the char you would like, take a propane or butane torch to them. Available at your local hardware store, small hand held torches are handy for many kitchen cooking tasks. As with any indoor flaming, be sure to have proper ventilation.

To really make a superb meat patty, try seasoning the ground meat before you form the patty for extra flavor. Salt, pepper, or one of my favorites, sauteed minced shallot, make a great start. Add whatever seasoning you like best, just don’t make the bits too big. Cheese, peppers, eggs, bread crumbs, herbs, spices, dried fruit, vegetables…all are eligible innovations at the right place and time.

Whether they are old stand-by’s or new favorites, condiments, like the patty and bread, need to be of the freshest, ripest and best quality, and be distributed evenly over the sandwich for admirable results. Go wild and grill up some thinly sliced juicy ripe pineapple, slather with scallion, jalepeno & nutmeg laced mayonnaise, and add fresh cilantro sprigs to a chicken, turkey, crab or shrimp burger.

I particularly like to put the big three saucy burger toppings, ketchup, mustard and mayonnaise, in squeeze bottles for easy application. I find store bought ketchup & mustard sometimes too runny, so I drain them first. Just empty the bottle or jar onto a sheet pan lined with about 10 layers of paper towels and wait about 10 to 20 minutes. The ketchup or mustard closest to the toweling will be thicker. Using a rubber or metal spatula, scrape the contents off the tray into a bowl and whisk until homogenous. Empty the bowl into a zip lock bag, sealing the zipper and cutting a little off one bottom corner, then ease the contents into the squeeze bottle. The mayonnaise has a little bit different story. I find off the shelf jars of it to be lumpy. I empty the jar into a bowl and whisk the mayonnaise until smooth, then fill the squeeze bottle like I do the others.

There are no hard and fast rules. It’s all about what you and your audience like. I am happy to answer any questions you might have at http://www.marilindahodgdon@gmail.com

Also check out my articles on the Huffington Post at http://www.huffingtonpost.com/marilinda-hodgdon/  and my professional web site at www.marilinda.com

Read Full Post »

Roasted Quail on Crispy Pasta Nest

Photo by David Bishop

Quail is one of my favorite poultry choices. The meat is delicate in both texture and flavor. Most quail available for purchase is boned except for the legs and wings. I used a half of apricot to plump up the breast for structure, flavor and juiciness. Using white sewing thread, I stitched the opening and trussed the legs. The cute little birds are seasoned with white pepper, seared in butter and roasted at 400′ F for about 15 minutes, glazing with a pastry brush during cooking at least 3 times, until browned and tender. I usually brine poultry before cooking for flavor and tenderness. If you choose to do this, be sure to brine the meat before it is stuffed and dry it well. As an appetizer use one bird per person. For an entree 2-3 birds each.

I chose to present the quail as an appetizer on a nest of fried spaghetti for drama, and garnished with pine nuts, fried zucchini flower, chervil and sauteed apricot pieces.

Brine

  • 1 gallon of water
  • 1 cup sea salt
  • 1 small onion cut into pieces (optional)

Dissolve the salt and chill the solution. Soak the quail for one hour in the refrigerator, making sure they are completely covered . Dry thoroughly before stuffing.

Glaze

  • 2 cups freshly squeezed orange juice with pulp
  • 1 cup honey

Whisk the juice and honey together. In a sauce pan reduce the mixture over medium heat by half, being careful not to scorch, Brush it on the quail before, during and after roasting. Roast on a parchment lined 1/2 sheet pan at 400’F for about 15 minutes, until browned and tender. Serve with the remaining glaze.

Also, check out my Huffington post site at http://www.huffingtonpost.com/marilinda-hodgdon/

Read Full Post »

Kaleidoscopic Lollipop

Photo by David Bishop

Many years ago I was hired for a food styling job for a Dominoes Sugar billboard campaign. They supplied me with their recipe for hard crack candy, which can be used in making lollipops. The premise of the campaign was that anyone can make them, and that free form lollipops are fun. Given the parameters of both holiday and everyday themes, they asked me to come up with forms that would serve their vision and could be incorporated into their ads. I used regular lollipop sticks for some and knotted ribbons in others, for hanging adornments, ie. Christmas trees. I had tons of fun creating many lollipops and learned so much in the process.

My mother had a passion for unique & interesting Christmas tree ornaments, so I wrapped selected be-ribboned lollipops with waxed paper and stored them boxed in plastic in a cool dry place until Christmas, as a present to her. The translucence of these colored candies lend a lovely light quality to any occasion. The stick versions make fun centerpieces in a vase, or wrapped in translucent candy bags, tied with ribbons as party favors. The accouterments (sticks & bags) can be had at gourmet cooking stores.

I will guide you through the process of making free form lollipops with all the helpful styling and safety tips I learned along the way. Here is what the ad looked like.

Domino Lollipop Print Ad

To recap the recipe, directions and tips:

Lollipops

  • 2 cups granular cane sugar
  • 2/3 cup clear corn syrup
  • 1/2 cup water
  • Flavoring and food coloring, as desired
  • Colorful Ribbons, lollipop or ice cream sticks

For safety sake, fill a large bowl with ice and water as an ice plunge, and have it nearby in case you splash any hot candy on your skin. If you do, plunge your skin immediately into the ice water. Prepare sheets of aluminum foil on cookie sheets or straight on the counter, to receive the liquid candy. Have lollipop sticks, knotted colored ribbons and small candies ready to stick into hot candy lollis. The candy cools right away, once poured, so do them one at a time. You can re-heat the candy in the Pyrex in a microwave oven if the liquid gets too thick to pour easily.

  1. In a metal sauce pan, combine the first three ingredients together, stirring over low heat until they are completely dissolved.
  2. Increase to high heat. Bring the mixture to a boil for about 15- 20 minutes, without stirring, (the quicker the better to avoid discoloration) . Using a candy thermometer, or fryer thermometer, let the mixture just come to 300′ F, hard crack candy stage. Remove from heat.
  3. Blend in flavoring and color, stirring carefully.
  4. Half way fill a one cup Pyrex liquid measuring cup to use as a pouring vessel. Never over fill your poring vessel!
  5. Pour shapes according to your own imagination and quickly add ribbons, sticks and candies.
  6. Let cool to room temperature.

Here is are some simple yet pretty versions

Lollis with Flavorful Seeds

Photo by David Bishop

To make them Kaleidoscopic, as pictured in the intro photo, use the above recipe and directions to make sheets of your personal color palette, tinted hand poured candy onto smooth flat surfaces of foil. Let them cool to room temperature and break into small pieces. Place the pieces of each color separately onto appropriately large trays or plates, so that you can see the individual pieces.

Make a batch of clear, uncolored candy and pour shapes, one at a time, on foil as before, placing the sticks in immediately, and adding the colored shards in the patterns you desire. Re-heat some of the clear candy, and pour over your colored pieces to ensure they adhere to the clear base lolli.

Flavoring suggestions:

Extracts of; orange, lemon, grapefruit, vanilla, peppermint, cinnamon, hazelnut, almond, rose and lavender, or whatever you think of or find.

Visit my Huffington Post blog at http://www.huffingtonpost.com/marilinda-hodgdon/

Read Full Post »